[06] 為什麼 EKS cluster 可以讓 Pod 部署至 Fargate
在開始主題之前,先簡單介紹一下 AWS Fargate。在 AWS EC2 服務,我們可以隨意啟用 EC2 instance 作為我們的主機來使用,而在 ECS 或是 EKS 服務上,則可以直接部署容器服務,如 ECS Service/Task 或是 EKS Deployment/Pod 到 AWS 託管的主機上。換言之,對於使用者可以更減少維護主機的成本,取而代之則是依照 vCPU、memory、作業系統、CPU 架構及儲存大小等五個維度計價1。
在 EKS 服務,我們則可以透過建立 Fargate Profile 方式指定 namespace 及相應 label 後2,EKS 則可以整合 AWS Fargate 節點而無需手動管理節點。故本文將探討「為什麼 EKS cluster 可以部署至 Fargate 而非透過原生 Kubernetes 方式部署至 EKS worker node 」,希望理解 EKS 是如何更新 Pod 調度過程。
建立環境
- 建立 Fargate Profile 並指定 namespace 名稱為
fargate-ns。
$ eksctl create fargateprofile \
    --cluster ironman-2022 \
    --name demo-profile \
    --namespace fargate-ns
2022-09-20 20:08:51 [ℹ]  deploying stack "eksctl-ironman-2022-fargate"
2022-09-20 20:08:51 [ℹ]  waiting for CloudFormation stack "eksctl-ironman-2022-fargate"
2022-09-20 20:09:21 [ℹ]  waiting for CloudFormation stack "eksctl-ironman-2022-fargate"
2022-09-20 20:09:21 [ℹ]  creating Fargate profile "demo-profile" on EKS cluster "ironman-2022"
2022-09-20 20:11:31 [ℹ]  created Fargate profile "demo-profile" on EKS cluster "ironman-2022"
- 建立 fargate-ns namepsace。
kubectl create ns fargate-ns
- 透過 kubectl 建立 Nginx Pod 於 fargate-ns 及 default namespace。
kubectl run nginx --image=nginx -n fargate-ns
kubectl run nginx --image=nginx -n default
- 將 Pod 資訊輸出成 YAML 文件。
kubectl -n default get po nginx -o yaml > default-nginx.yaml
kubectl -n fargate-ns get po nginx -o yaml > fargate-nginx.yaml
分析
透過 diff 命令比對,以下僅列舉較大差異部分,其他如 timestamp 或是 namespace 不同處則省略。
$ diff fargate-nginx.yaml default-nginx.yaml
5,6d4
<     CapacityProvisioned: 0.25vCPU 0.5GB
<     Logging: 'LoggingDisabled: LOGGING_CONFIGMAP_NOT_FOUND'
...
...
10d7
<     eks.amazonaws.com/fargate-profile: demo-profile
...
...
...
30c27
<   nodeName: fargate-ip-192-168-185-38.eu-west-1.compute.internal
---
>   nodeName: ip-192-168-65-212.eu-west-1.compute.internal
32,33c29
<   priority: 2000001000
<   priorityClassName: system-node-critical
---
>   priority: 0
35c31
<   schedulerName: fargate-scheduler
---
>   schedulerName: default-scheduler
...
...
...
可以發現到部署至 Fargate Pod 不同處有以下幾個
- 多出以下 3 個 annotations :
- CapacityProvisioned
- Logging
- eks.amazonaws.com/fargate-profile
- node name 為 Fargate node
- schedulerName 為 fargate-scheduler 而非 default kube-scheduler
接續,我們使用以下 CloudWatch Log Insights Syntax 查看 audit log 觀察 API server 是否有針對此 Pod 進行更新,整理如下時間軸及摘要重要資訊:
filter @logStream like /^kube-apiserver-audit/
 | fields @timestamp, @message
 | sort @timestamp asc
 | filter objectRef.name == 'nginx' AND objectRef.resource == 'pods' AND verb != 'get'
 | limit 10000
stageTimestamp 2022-09-20T20:17:17.328703Z
kubectl 建立此 Pod,其中經過 3 個 Mutating webhook,而被 Mutate webhook 0500-amazon-eks-fargate-mutation.amazonaws.com 更新 schedulerName 為 fargate-scheduler,以及上述 3 個 annotations:
annotations.mutation.webhook.admission.k8s.io/round_0_index_0:{"configuration":"0500-amazon-eks-fargate-mutation.amazonaws.com","webhook":"0500-amazon-eks-fargate-mutation.amazonaws.com","mutated":true}annotations.mutation.webhook.admission.k8s.io/round_0_index_2:{"configuration":"pod-identity-webhook","webhook":"iam-for-pods.amazonaws.com","mutated":false}annotations.mutation.webhook.admission.k8s.io/round_0_index_3:{"configuration":"vpc-resource-mutating-webhook","webhook":"mpod.vpc.k8s.aws","mutated":false}annotations.patch.webhook.admission.k8s.io/round_0_index_0:{"configuration":"0500-amazon-eks-fargate-mutation.amazonaws.com","webhook":"0500-amazon-eks-fargate-mutation.amazonaws.com","patch":[{"op":"add","path":"/spec/schedulerName","value":"fargate-scheduler"},{"op":"add","path":"/spec/priorityClassName","value":"system-node-critical"},{"op":"add","path":"/spec/priority","value":2000001000},{"op":"add","path":"/metadata/labels","value":{"eks.amazonaws.com/fargate-profile":"demo-profile","run":"nginx"}}],"patchType":"JSONPatch"}requestObject.spec.schedulerName:default-schedulerresponseObject.spec.schedulerName:fargate-scheduler
stageTimestamp 2022-09-20T20:17:18.503220Z
由 username eks:fargate-scheduler 更新 request 先前所提及的 Mutate webhook 0500-amazon-eks-fargate-mutation.amazonaws.com 內容。
user.username:eks:fargate-schedulerverb:updaterequestObject.spec.schedulerName:fargate-schedulerrequestObject.metadata.labels.eks.amazonaws.com/fargate-profile:demo-profilerequestObject.metadata.annotations.CapacityProvisioned:0.25vCPU 0.5GBrequestObject.metadata.annotations.Logging:LoggingDisabled: LOGGING_CONFIGMAP_NOT_FOUND
stageTimestamp 2022-09-20T20:18:16.033300Z
由 username eks:fargate-scheduler 建立 Nginx Pod 及 Fargate Node fargate-ip-192-168-185-38.eu-west-1.compute.internal 綁定。
user.username:eks:fargate-schedulerverb:createrequestObject.kind:BindingrequestObject.target.name:fargate-ip-192-168-185-38.eu-west-1.compute.internal
stageTimestamp 2022-09-20T20:18:16.054810Z 及 2022-09-20T20:18:23.041304Z
此兩個 patch 皆是由 kubelet 更新 Pod condition 狀態最終至 Ready
user.username:system:node:fargate-ip-192-168-185-38.eu-west-1.compute.internaluserAgent:kubelet/v1.22.6 (linux/amd64) kubernetes/35f06c9verb:patch
什麼是 Mutate webhook
根據 Kubernetes blog A Guide to Kubernetes Admission Controllers3,Kubernetes Admission Controllers 功能提供一種方式讓經驗證後的 API 請求修改 API 請求內的 object 或是拒絕請求的一道防衛門。Admission control 過程上可以分成兩階段,其細節流程讀如下所示:
- mutating:其最終目的是修改 API object 確保一些預設數值或是增加功能。如:修改 Pod spec 中的 CPU 或是 Memory 預設值,或 Service Mesh inject sidecar container 至每一個 Pod。
- validating:其目的為確保每一個 object 都是被維護的,換言之,類似於某種 Policy。如:Gatekeeper4 可自定義 policy 確保至少 replica 數量為 3,或是可以定義annotation 中需要有 email 欄位作為 resource owner。
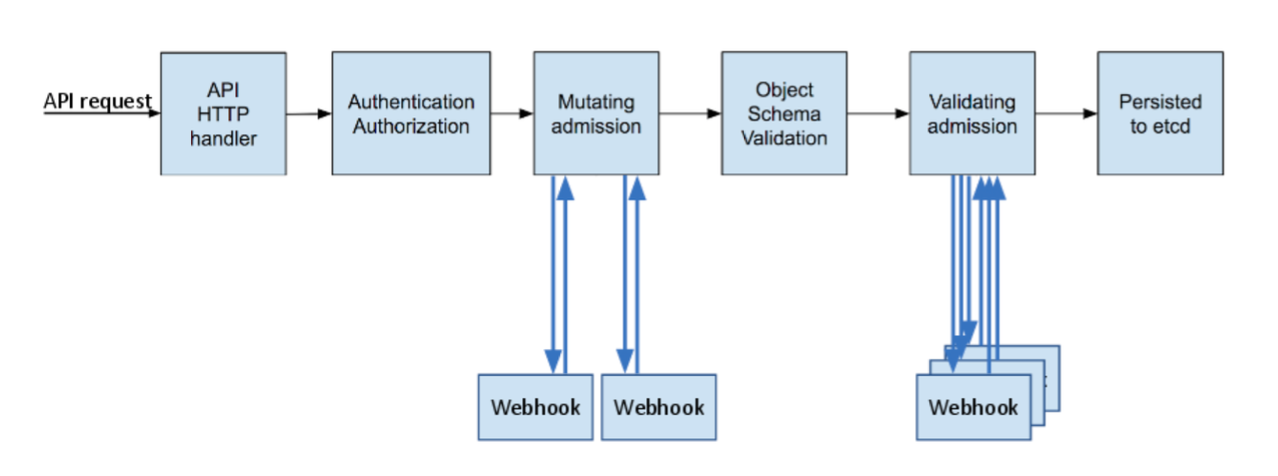
0500-amazon-eks-fargate-mutation.amazonaws.com 是否為 Mutating webhook
答案:是
依照上述 audit log,其實我們就已經知道答案。在 annotations.mutation.webhook.admission.k8s.io 代表了 mutating webhook,而 round_0_index_0 代表了第一輪 mutation 中第一個 mutating webhook 並且成功 mutation[5]。而其他 mutating webhook 分別為:
- pod-identity-webhook
- vpc-resource-mutating-webhook
我們可以透過 kubectl 命令查看對應 mutating webhook 資源,其中我並未手動建立 0500-amazon-eks-fargate-mutation.amazonaws.com mutating webhook configurations:
$ kubectl get mutatingwebhookconfigurations
NAME                                             WEBHOOKS   AGE
0500-amazon-eks-fargate-mutation.amazonaws.com   2          3h47m
pod-identity-webhook                             1          6d14h
vpc-resource-mutating-webhook                    1          6d14h
再次使用 CloudWatch Logs insight syntax,查看是誰幫忙建立部署此 mutating webhook 。
filter @logStream like /^kube-apiserver-audit/
 | fields @timestamp, @message
 | sort @timestamp asc
 | filter objectRef.name == '0500-amazon-eks-fargate-mutation.amazonaws.com' AND objectRef.resource verb == 'create'
 | limit 10000
由以下資訊,可以得知是由 EKS username eks:cluster-bootstrap 透過 kubectl 方式部署,比對時間與 Fargate Profile 建立時間相符。
userAgent:kubectl/v1.22.12 (linux/amd64) kubernetes/dade57buser.username:eks:cluster-bootstrapstageTimestamp:2022-09-20T20:09:59.446214Z
總結
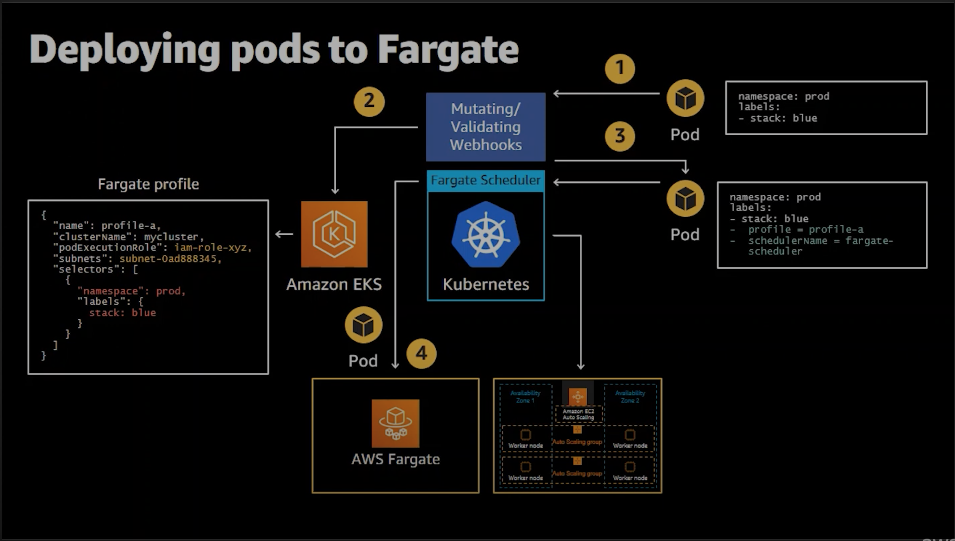
此流程圖出自於 AWS re:Invent 2020: Amazon EKS on AWS Fargate deep dive5
由上述 log 比對,我們可以知道流程為:
- 於 Pod spec 定義相應 namespace 及 label。
- 在建置 Fargate Profile 同時,EKS 部署
0500-amazon-eks-fargate-mutation.amazonaws.commutating webhook。 - 基於 Fargate Profile 所指定 namespace 及 label 更新 Pod spec annotation 及 scheduler。
- Fargate scheduler 調度 Fargate 節點,Pod 部署至 Fargate node 。
參考文件
Footnotes
-
AWS Fargate Pricing - https://aws.amazon.com/fargate/pricing/ ↩
-
Getting started with AWS Fargate using Amazon EKS - https://docs.aws.amazon.com/eks/latest/userguide/fargate-getting-started.html ↩
-
A Guide to Kubernetes Admission Controllers - https://kubernetes.io/blog/2019/03/21/a-guide-to-kubernetes-admission-controllers/ ↩
-
How to use Gatekeeper - https://open-policy-agent.github.io/gatekeeper/website/docs/howto/ ↩
-
AWS re:Invent 2020: Amazon EKS on AWS Fargate deep dive - https://www.youtube.com/watch?v=9tQFXEhHdn0 ↩